• Create a new skin/Edit existing skin
• Skins structure
• App sections
• File types
• Create a Skin Project and build a Skinz file
• Create a new skin/Edit existing skin ^
First, design or edit a skin in Photoshop software and save it as a JPG file. Then open the JPG file in the Skin editor and set the general settings. Then set the properties and location for items. Save the files. Finally copy JPG, Skin, PNG (If exists), and Part (If exists) files into the device.
• Skins structure ^
Pages: Each skin might contain a main and some part pages.
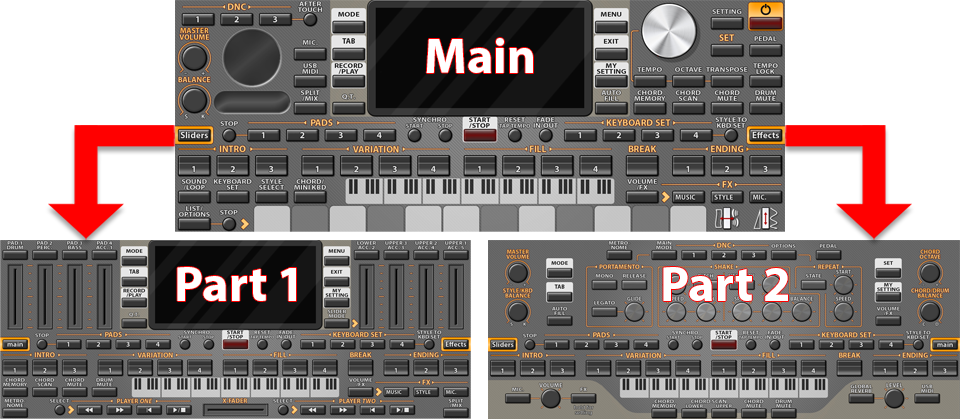
A skin with three pages
Sections: Each page contains 2 main sections. Main and Tab sections. (Tab section appears after tapping on Tab button).
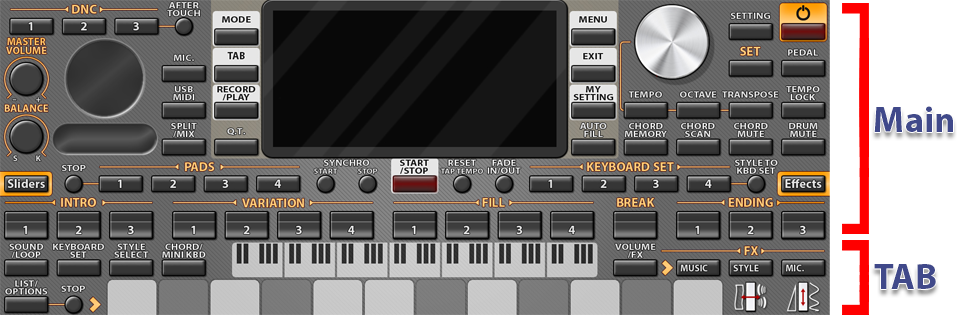
A page containing one Tab
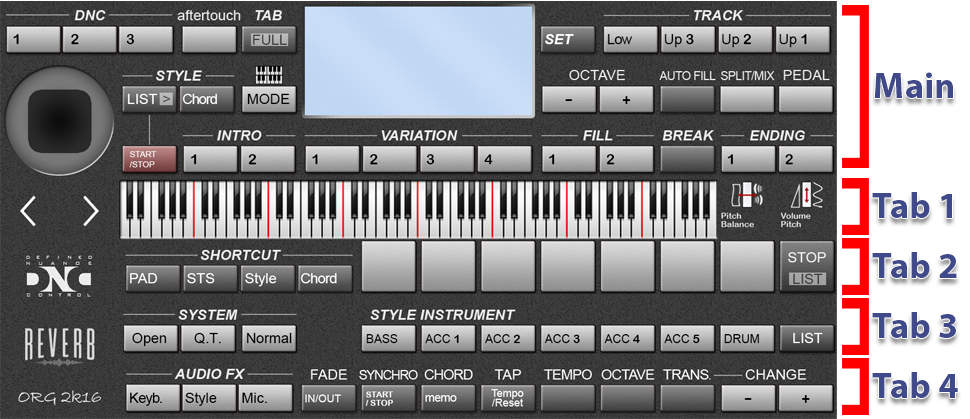
A page containing four Tabs
Blocks: Each page contains some blocks. The blocks define width and height. Each block includes a square or rectangle of the screen.
Items: Each page contains some items. Each item defines some blocks in a rectangle. Ex: Monitor item, Joystick item, Style pad buttons item, etc.
Sub-items: Items might contain child items that are arranged horizontally, vertically, or in a rectangle. Ex: Style pad button item includes Pad1 to Pad 4 sub-items.
LED: Some sub-items have one or two LEDs to display the status. The layout and color of the LEDs can be adjusted on each page of the skin, or the LEDs of each item can be adjusted individually.
• App sections ^
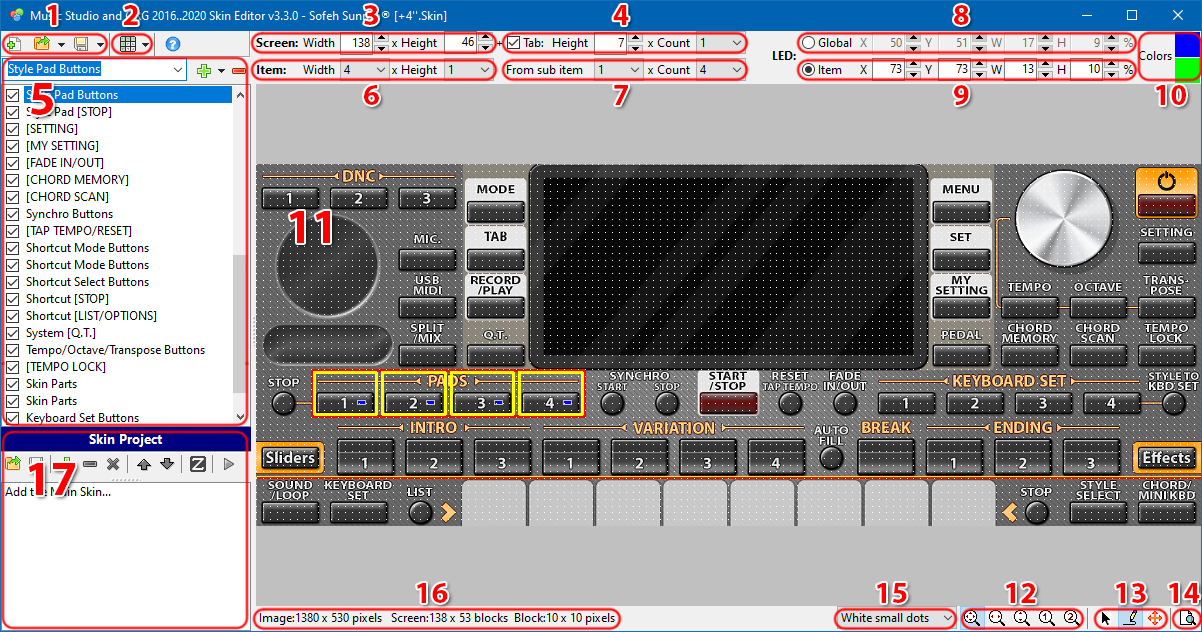
1- Create/Open/Save a page in the skin
2- Move items
3- Set the number of the blocks on the page
4- Set the number of the blocks in the Tab section
5- Choose the current item to be set
6- Set the number of sub-items in the selected item
7- Set the start item and the number of sub-items in the selected item
8- Default settings for LEDs on the screen
9- LED settings of an item
10- Adjust the primary and secondary color of the LEDs on the screen
11- The page and items
12- Zooming
13- Tools for selecting and drawing items and page scrolling
14- Overview of items on the screen
15- Set the way blocks are displayed
16- Displays the number and size of the image and blocks
17- Skin project/Skinz preparation section
• File types ^
Skin: Main page skin
Part: Secondary pages skin
JPG: Skin page images
PNG: Moving components image such as sliders, volumes, joystick, etc.
Acceptable PNG file names:
for one skin                      for all skins in the folder
skin#Joystick.png                 Joystick.png
skin#JoystickVIP.png              JoystickVIP.png
skin#SliderH.png                  SliderH.png
skin#SliderV.png                  SliderV.png
skin#Value.png                    Value.png
skin#ValueDot.png                 ValueDot.png
skin#Volume.png                   Volume.png
skin#White.png                    White.png
skin#WhitePress.png               WhitePress.png
skin#Black.png                    Black.png
skin#BlackPress.png               BlackPress.png
skin#Black2.png                   Black2.png
skin#Black2Press.png              Black2Press.png
SkinProject: Skin project, containing the main page and parts paths, to be used for exporting as a Skinz file.
Skinz: The compressed version of a skin, part, JPG, and PNG files in a single file.
• Create a Skin Project and build a Skinz file ^
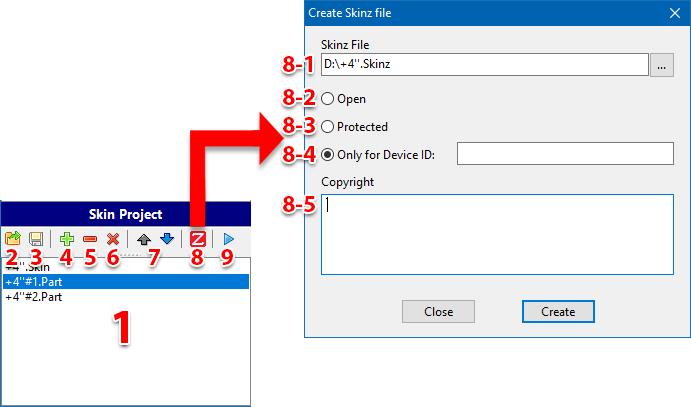
Skin project, containing the main page and parts paths, to be used for exporting as Skinz file.
1- Views the list of the added Skin and Parts
2- Opens a project file
3- Saves the project file
4- Adds skin and part files
5- Removes the selected added files in the list
6- Clears the list
7- Sets the order of part files
8- Exports as Skinz file
8-1- Title and path of Skinz file to be exported
8-2- Exports as a normal Skinz file (Can be used and edited by other users)
8-3- Exports as a protected Skinz file (Can be used but not edited by other users)
8-4- Exports as a protected Skinz file (Can be used only for the device with the defined ID)
8-5- A custom text is included in the zip file to be shown in the comments section.
9- Opens the current skin for editing.